
“NordVPN Won’t Connect on iPhone”
Are you experiencing this issue?
If NordVPN doesn’t connect on your iPhone, you may be unable to safely use public Wi-Fi or watch region-restricted content.
This article explains how to fix NordVPN connection issues on iPhone.
目次
Causes and Solutions for NordVPN Connection Issues on iPhone
Let’s go over the possible causes and solutions when NordVPN won’t connect on iPhone.
The common reasons that apply to all devices include:
- NordVPN subscription has expired
- Unstable internet connection
- VPN server issues
- Outdated NordVPN app version
- Required ports for NordVPN are not open
- Security software interference
For more details, check out the next article.
If you are using an iPhone, in addition to the above, check the following solutions as well.
Switch to Mobile Data
In some cases, Wi-Fi networks may be the reason why NordVPN won’t connect.
Try switching your iPhone from Wi-Fi to mobile data.
How to Turn Off Wi-Fi:
- Your iPhone will automatically switch to mobile data.
- Swipe down from the top-right corner (or swipe up from the bottom if your iPhone has a home button) to open the Control Center.
- Tap the Wi-Fi icon to turn it OFF.
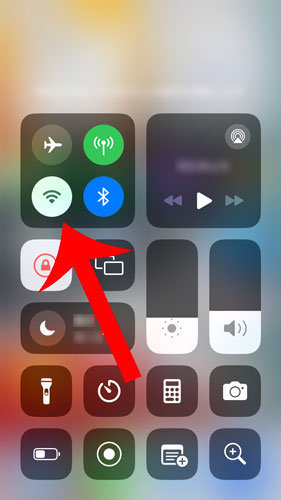
※ You can also turn off Wi-Fi from the Settings app under “Wi-Fi.”
Change the VPN Protocol
In some cases, NordVPN may not connect due to the selected VPN protocol.
Try changing the VPN protocol in NordVPN settings to “OpenVPN (TCP)”.
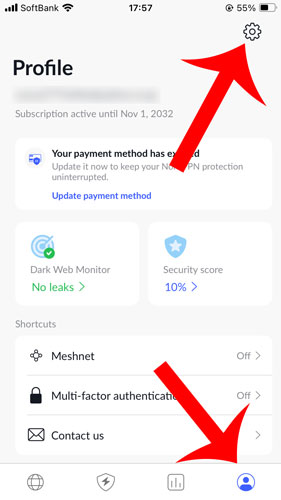
Go to Settings
Open the NordVPN app on your iPhone, then tap the “Profile Icon” in the bottom menu, followed by the “Gear Icon” to access the settings.
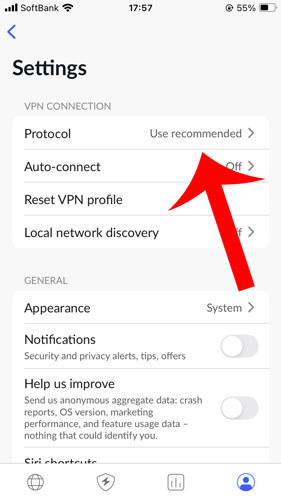
Tap “Protocol”
In the Settings menu, tap “Protocol” to proceed.
Change to OpenVPN (TCP)
In the VPN Protocol Selection screen, select “OpenVPN (TCP).”
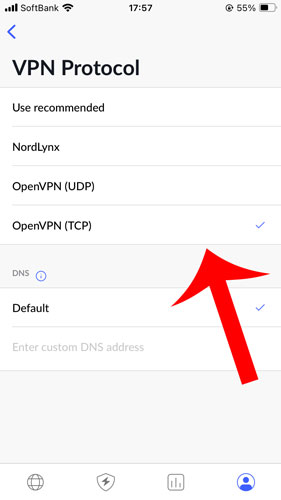
The available VPN protocols for the iPhone version of NordVPN are as follows:
| NordLynx | NordVPN’s proprietary VPN protocol, NordLynx, is based on the ultra-fast WireGuard technology. It has been developed to significantly enhance stability and security while maintaining high-speed performance. |
|---|---|
| OpenVPN(UDP) | It is a widely used, license-free open-source VPN protocol designed for high-speed communication. |
| OpenVPN(TCP) | It is an open-source VPN protocol designed with a focus on reliability and stability. |
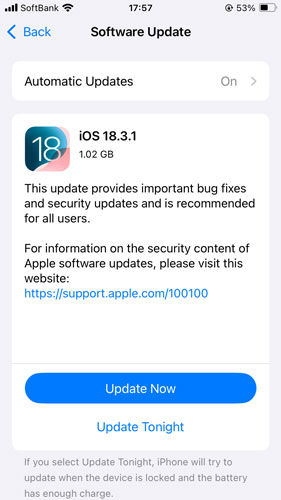
Update iOS to the Latest Version
An outdated iOS version may cause connection issues with NordVPN.
Try updating your iPhone’s iOS to the latest version.
How to Update iOS:
- Update to the latest iOS version if available.
- Open the Settings app.
- Go to “General” → “Software Update.”
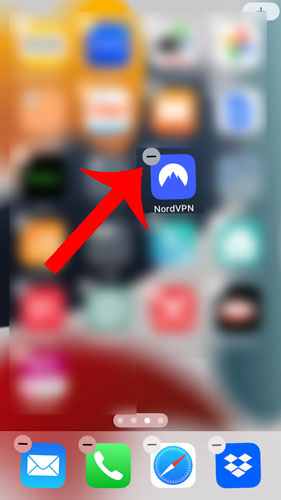
Reinstall the NordVPN App
In some cases, NordVPN may not connect due to an app malfunction.
Try reinstalling the NordVPN app to resolve the issue.
How to Uninstall NordVPN:
- Press and hold the NordVPN app.
- Tap the “-” (minus) icon in the top-left corner.
- Select “Delete App.”
How to Reinstall NordVPN:
- Search for “NordVPN” and install the app again.
- Open the App Store.
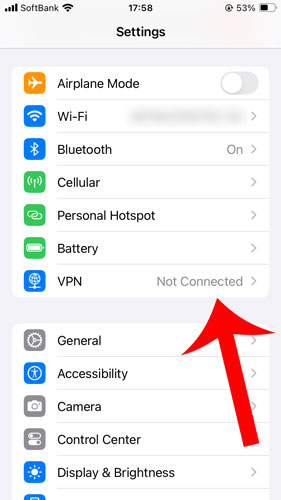
Reset VPN Configuration
If there is an issue with the VPN configuration, NordVPN may fail to connect.
Try resetting the VPN configuration on your iPhone.
Go to VPN Settings
Open the Settings app and tap “VPN.”
Open NordVPN Settings
In the Device VPN section, find “NordVPN” and tap the “Info icon.”
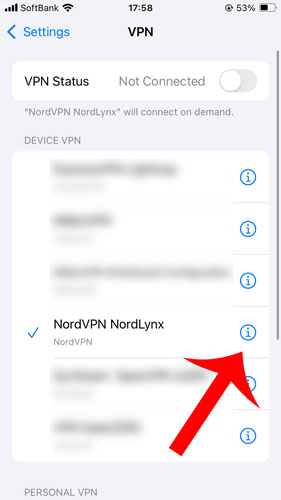
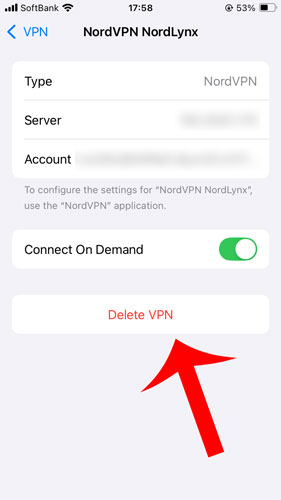
Delete VPN
Tap “Delete” to confirm.
In the NordVPN settings screen, tap “Delete VPN.”
A confirmation message “Do you want to delete the VPN?” will appear.
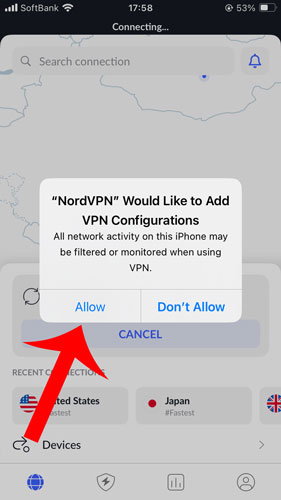
Add VPN Configuration
The setup is now complete.
Open the NordVPN app and connect to the VPN.
When the message “NordVPN wants to add VPN configurations” appears, tap “Allow.”
Set DNS Server Address
If you are using Wi-Fi, DNS settings may be causing connection issues.
Try adding the following DNS server addresses in your iPhone’s Wi-Fi settings:
- 103.86.99.100
- 103.86.96.100
Go to Wi-Fi Settings
Open the Settings app and tap “Wi-Fi.”

Open Wi-Fi Advanced Settings
Tap the “Info icon” next to your current Wi-Fi network.

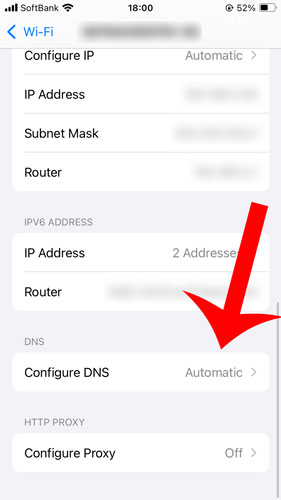
Open DNS Configuration
Tap “Configure DNS.”
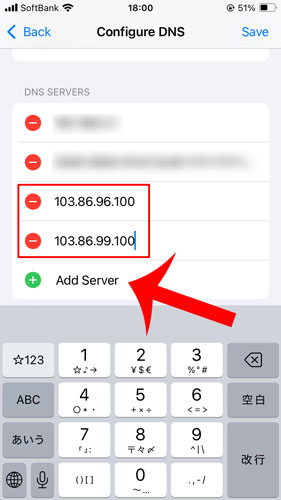
Add DNS Server Address
Tap “Save” to complete the setup.
In the “Configure DNS” screen, change the setting from “Automatic” to “Manual.”
Tap “Add Server” and enter:
- 103.86.96.100
- 103.86.99.100
Tap “Save” to complete the setup.
How to Contact NordVPN
If you have tried all the solutions above and the issue is still not resolved, you may consider contacting NordVPN support.
NordVPN offers two ways to contact customer support.
| Chat | ||
|---|---|---|
| Reception Hours | 24 hours a day, 365 days a year | 24 hours a day, 365 days a year |
| Response to Questions | Realtime | At a Later Date |
| Japanese Support Available | ◯ | ◯ |
| Attachment | Location, Files, Images | Files, Images |
If you need immediate assistance, using the chat support will allow you to receive real-time assistance.

Leave a Reply