
“I no longer use NordVPN, so I canceled my subscription.”
If that’s the case, don’t forget to uninstall the NordVPN app from your computer.
Even if you cancel your NordVPN subscription, the app will not be removed automatically.
Unless you manually uninstall the application, it will remain on your computer indefinitely.
In this article, we will explain how to uninstall the NordVPN app in detail.
目次
Benefits of Uninstalling the NordVPN App
First, let’s take a quick look at the advantages of uninstalling the NordVPN app.
Increased Hard Drive Space
Uninstalling the NordVPN app can free up space on your HDD or SSD.
For example, removing the Windows version of NordVPN can free up approximately 190MB of storage.
Improved PC Performance
Uninstalling the NordVPN app may help improve your computer’s performance.
NordVPN has a setting that automatically launches the app when Windows starts, which could slow down system startup and overall operation.
By uninstalling NordVPN, you can prevent unnecessary CPU and memory usage caused by startup and background processes.
Uninstalling the NordVPN app can help keep your computer organized and make it easier to find other apps.
As unnecessary apps accumulate, the Windows Start Menu or Mac Launchpad can become cluttered, making it harder to locate the apps you need.
By removing unused applications, you can declutter your system and quickly find important apps when needed.
How to Uninstall and Completely Remove NordVPN
From here, we will explain the uninstallation and complete removal process for NordVPN.
NordVPN for Windows
This section covers how to uninstall and completely remove NordVPN from a Windows PC.
As of the time of writing, the most widely used version is Windows 10, so we will focus primarily on the uninstallation process for Windows 10.
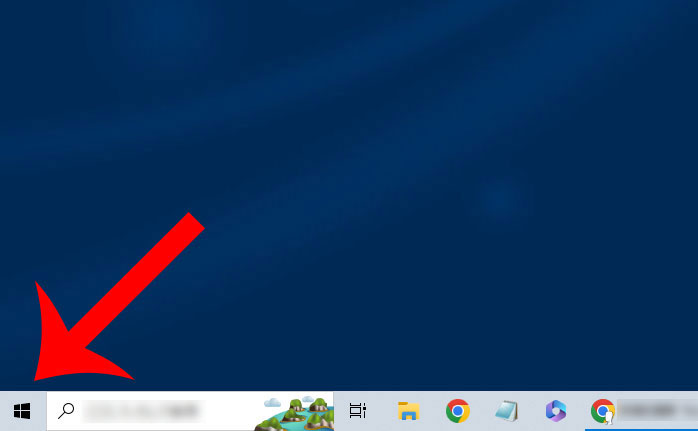
Open the Start Menu
First, click the Windows icon in the bottom left corner to open the Start Menu.
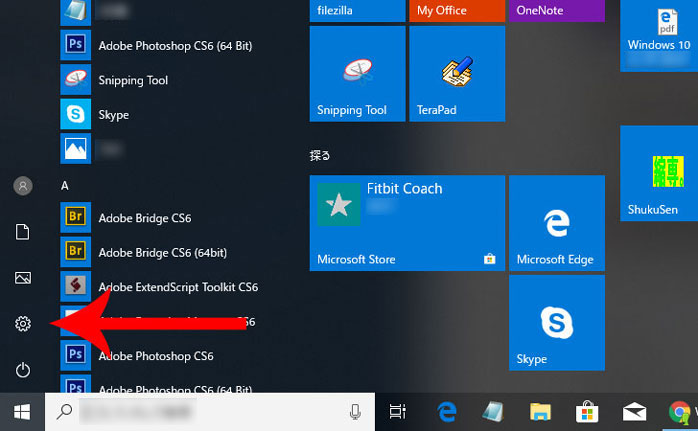
Open Windows Settings
Once the Start Menu is open, click the gear icon to access Windows Settings.
Open the App List
In Windows Settings, click “Apps – Uninstall, Defaults, Optional Features”.
Find NordVPN
A list of installed applications will appear. Look for “NordVPN”.
You may see multiple entries, such as:
- NordVPN
- NordVPN network TAP
- NordVPN network TUN
Click on “NordVPN”, which has the largest file size.
Tip: If you can’t find NordVPN in the list, use the search function to locate it quickly.
Execute the Uninstallation
Click “Uninstall” when it appears next to NordVPN.
A message will appear:
“Are you sure you want to completely remove NordVPN and all of its components? Warning: All files in the installation folder will be deleted.”
Click “Yes” to proceed with the uninstallation.
NordVPN for Mac
How to uninstall and completely remove NordVPN from a Mac computer.
Find “NordVPN IKE” in Launchpad
Open Launchpad on your Mac to view installed applications and locate “NordVPN IKE”.
Tip: You can open Launchpad by clicking the Launchpad icon in the Dock or using a pinch-in gesture with your thumb and three fingers on the trackpad.
Uninstall the NordVPN App
- Hover the mouse cursor over the NordVPN app.
- Press and hold the “Option” key on the keyboard.
- When the NordVPN app icon starts to wiggle, click the “✕” in the top left corner.
- A message will appear: “Are you sure you want to delete NordVPN IKE?”
- Click “Delete” to proceed with the uninstallation.
Deleting the NordVPN app on a smartphone is very simple.
- For iPhone: Press and hold the NordVPN app, tap the “-“ in the top left corner, then select “Delete”.
- For Android: Press and hold the NordVPN app, drag it to the “Uninstall” option at the top of the screen, then release and tap “OK”.
Reasons Why NordVPN Cannot Be Uninstalled
If you are unable to uninstall or completely remove NordVPN, the following reasons may be the cause.
NordVPN is Running
If NordVPN is running, it may prevent uninstallation.
Try the following solutions:
- Restart your computer and then attempt to uninstall NordVPN.
- Alternatively, open Task Manager by right-clicking on the taskbar.
- Go to the “Processes” tab.
- Select NordVPN.
- Click “End Task (E)”.
- Then, proceed with the uninstallation.
Registry Information Does Not Match
If you are unable to uninstall NordVPN, it is possible that the registry information no longer matches the details from when it was originally installed.
Main Causes
Possible reasons include:
- Registry information was modified
- A registry cleaner deleted the registry data
- A major update or system upgrade was applied to Windows or Mac
What is Registry Information?
The registry is a database that stores software settings and configurations.
When you initiate an uninstallation, the system retrieves the registry data and uses it to remove the necessary files.
However, if the registry has been modified, deleted, or cannot be accessed, the system may fail to locate the necessary files for uninstallation, preventing the process from completing.
Antivirus Software is Interfering
Antivirus software may be blocking the uninstallation process, preventing NordVPN from being removed.
Try temporarily disabling your installed antivirus software before proceeding with the uninstallation.
For example, if you are using Trend Micro VirusBuster, you can:
- Proceed with the NordVPN uninstallation.
- Open the Trend Micro Support Tool.
- Click “Stop All Modules” to temporarily disable the antivirus protection.
Conclusion
In this guide, we explained how to uninstall and completely remove NordVPN from your device.
If you have canceled your NordVPN subscription and do not plan to use it again, it is recommended to uninstall the application as well.
Uninstalling unnecessary software offers several benefits, including:
- Freeing up storage space on your computer
- Improving system performance and speed
- Keeping your apps organized and easier to find
If you no longer need NordVPN, removing it will help keep your computer clean and optimized.

For Windows 11, click “Installed apps” or “Apps & features” from the Start Menu.
A list of installed applications will be displayed.
Find NordVPN, then click “…” → “Uninstall” to proceed with the uninstallation.